16 Steps to Swap Revit Door Panel Families
Sep 26, 2024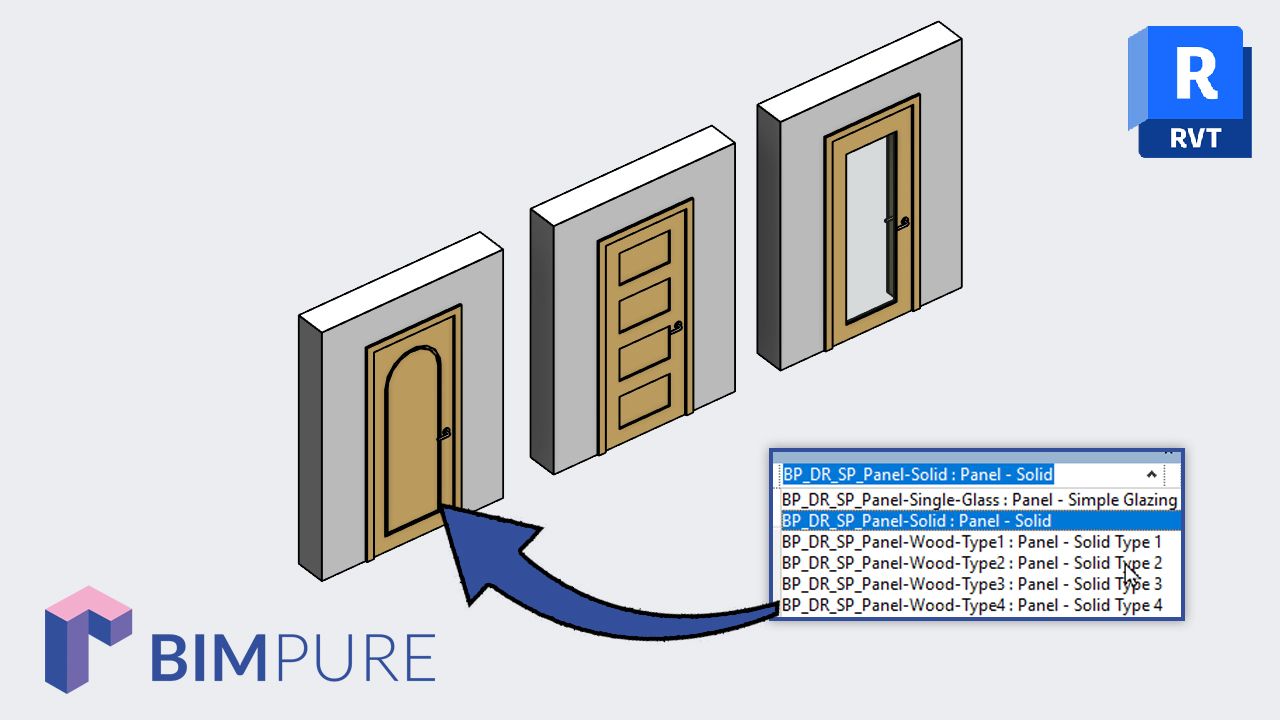
This post is available in the video format. Watch here:

You can set up your Revit door families to easily swap one door panel to another. This is possible with the <Family Type> parameter:

By using nested shared door panel families, you can use one panel in multiple door families without having to load them into each door family individually.
In effect, that means you can use the same door panel in both a single door and a double door, for example. If the type values of the panel are modified, all instances will be affected.

This guide explains all the steps to accomplish this.
When creating a panel, you need to start from the Generic Model family template. You can’t use the door family template because it generates a wall-hosted family, which doesn’t work for a panel.

After creating the family, click on the icon with the yellow folder in the Create tab. Switch the category from Generic Model to Doors.

In the instance properties of the family, check the box to make the family shared. In addition to being loaded in a family, it will also appear as a standalone family in the project.
Also, activate the work plane-based option. You will be able to place the panel family on any work plane. While not mandatory to make it work, this could be helpful if you want to set a rotation angle to the 3D door panel.

Add reference planes to form a rectangular shape for the family. Set the IsReference parameter to the planes by using the different sides (left, right, front, etc). Enter the side as the Name of the plane too. Make sure to keep the center reference planes.

Add EQ dimensions to the center reference planes. This ensures they always remain centered.

Create a dimension for the width of the panel. In the dropdown menu of the Label, pick the Width parameter.

Repeat the same process for the thickness.

In an elevation view, add a new reference plane for the height. Add the Height label to a dimension. Feel free to adjust these values so they reflect reasonable dimensions for door panels.

Since we’ll use these panels as shared families, the main dimensions must be instance-based. Select all the label dimensions, and check the box that says Instance Parameter.
Option: you can save this family as a Revit Family Template and use it for all door panels you want to build.

Use the extrusion tool to model the panel. In this case, we’re building a boring, simple, flat door panel. But you can model whatever you want. Lock the panel to the reference planes on the front, back, left and right.
Also, go to an elevation view and ensure the extrusion is constrained to the height reference planes, too.

For some reason, switching from a generic model family to a door family creates weird object styles graphics. Your panel might appear as blue. To fix this, go to the Object Styles menu. You can see how everything is weird.

Change all styles to have black colors and reasonable values for Project/Cut line styles, especially for the Panel subcategory. The geometry should now appear with normal graphic styles.

Pick the extrusion you have created, and in the instance properties, set it to the Panel subcategory. This way, you’ll be able to control the visibility and graphics of the panels directly in your projects.

What if you could download a collection of high-quality doors? Check out our collection of Revit door families.

Final thing before you load the family. Select the extrusion and assign a parameter to the material by clicking on the small rectangle in the instance properties. It should be an Instance parameter.

The family is ready. Save it and load it into the main door family.
A quick thing about the naming convention: you should think of a system to name the panels so you can easily spot them.
For example, at BIM Pure, doors are named BP_DOOR_[Description].
But nested shared panels are named: BP_DR_SP_[Description].
This way, it’s easy to know if a family is an actual door or just a panel by looking at the project browser.
Anyway, load the panel and place it on a work plane. Pick the Ref. Level and click anywhere to place the panel.

Select the instance you’ve just placed, and associate the Width, Thickness, and Height parameters from the panel to the values in the main door family. Also, associate the door panel material.

In a plan view, align and lock the nested panel to the correct reference planes.

In plan views, the visibility of the panel is managed with a nested plan swing symbol. Therefore, pick the nested panel and click on Visibility/Graphics Overrides. Turn off the visibility in Plan/RCP.

Now, we’ll add a parameter so users can swap to a different panel. This is called a <Family Type> parameter. Click on the nested panel family. In the options bar, click on the Label dropdown and add a new parameter.
Give a name like Panel Type and make it a type parameter... although some users might prefer instance, that’s fine.

This parameter allows users to swap the panel family to any other nested family in the doors category. That means you could theoretically swap the panel to a family that isn’t a panel. You’ll need to be careful.

Your family is ready! Load it into a project.
Inside a project, you can switch the Panel Type parameter to use any nested shared door panel included in the project. You can easily go from solid panel to glazed panel, and any other type.
For this to work, the nested panels must be shared, and loaded into the project. A benefit of this technique is that it helps to keep lightweight door families instead of including dozens of nested panels in them.


Would you like to have this entire post with extra bonus tips in the PDF format? Download our brand new, free edition of the Pamphlets publication. You will receive the entire collection of 34 PDF guides. Enjoy!
Enter your details below to get this free guide.