8 Steps to Create a Door Hardware Schedule in Revit
Jan 16, 2022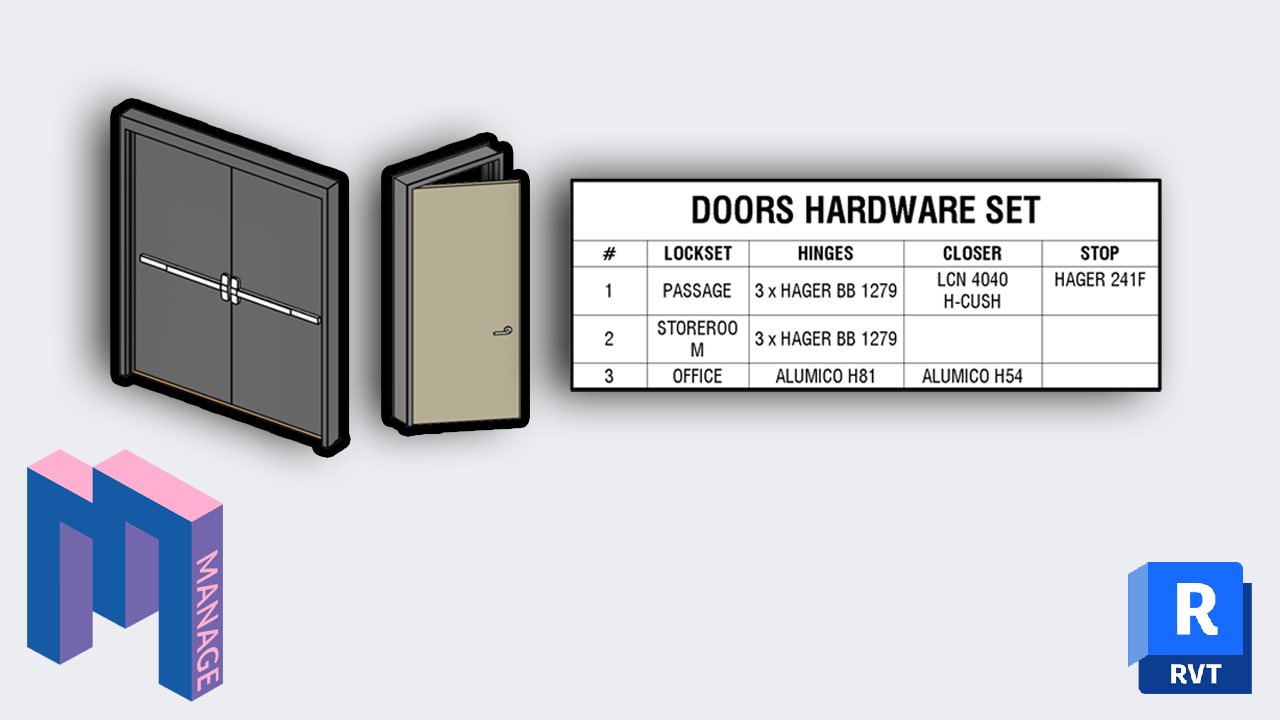
Many users don’t even bother creating a doors hardware set schedule in Revit. They instead rely on specs.
Revit is a database, and it is easier than most people think to create a door hardware schedule. You need to use the Key Schedule feature, which the majority of users don’t know about.
Here is the video tutorial for this post:
Let’s add a set of hardware components to your doors. First, you will need to add a parameter for each component. For this example, we’ll start with a few parameters:
Hinges
Locket
Closer
Create a new text, instance-based project parameter for each. You can group the parameter under a specific category to make sure they are all together. In this case, we use “Materials and Finishes”.
When you select a door, you should be seeing the new hardware parameters in the properties:

Optional: to clearly distinguish hardware parameters, you can set a prefix like HS (for Hardware Set). It’s also smart to use shared parameters to eventually embed the information in families and use it on tags.
Note: shared parameters in key schedules can only be used in Revit 2022 or more recent.

There is a chance you have no idea what a key schedule is. Create a regular schedule like usual and pick the doors category. Then, check the “Schedule Keys” box. Give the name “Hardware Set” to the key.

In the schedule, you can add all instance properties. In this case, pick all the hardware components:

By default, your schedule will be empty.

You will have to click on the Insert Data Row button.

Each row represents a hardware group. Create a few to get started:

Fill up the information for each hardware group. Of course, you can complete the schedule later on if you don’t have all the information yet.

You can rename the headers to remove the HS prefix.

You can add additional parameters later on, based on the information required on your doors.

Go back to the main door schedule. Add the “Hardware Set” field to the schedule.

For each door, select a hardware set from the dropdown menu.

Once you have set a hardware group to a specific door, the hardware parameters are locked and grayed out. You can see an example when a door is selected:

Now, make sure both the main door schedule and the key schedule (hardware set schedule) are placed on the sheet. You can see that the hardware set parameter in the main schedule refers to the second schedule.

If you have a lot of doors, you might like to see all doors grouped and sorted by the hardware set. Duplicate the main door schedule. In the Sorting/Grouping menu, sort by Hardware Set.

In the Formatting, activate Hidden Field for Hardware Set since the column would be redundant information.

Here is our resulting schedule. You can see all doors for each hardware set number.

Often, architects rely on consultants to complete the doors’ hardware specs. Often, the process involves manually entering back the information provided by the consultant.
With BIM, the old workflow is outdated. Instead, we’ll export and import the schedules directly from Revit. We recommend using the free DiRoots Sheetlink plugin. We won’t cover all the features for this plugin here, but we wrote a blog post about it here. Export the Doors Hardware Set schedule using this plugin.

Ask your hardware consultant to fill up the information in the excel spreadsheet. When you receive the file back, you can simply reimport it in Revit. The fields will be automatically replaced. A limitation though: you must pre-create the hardware group number in Revit for this technique to work.
In the image below, you can see that the information entered in Excel is reflected in the Revit schedule when imported back:


Did you enjoy this post? Download the PDF version and get extra door schedules tips.
Enter your details below to get this free guide.