20 Amazing pyRevit Features to Save Insane Amounts of Time
Jul 11, 2024
pyRevit is a legendary free, open-source, and community-driven plugin for Revit. Originally created by Ehsan Iran-Nejad, a team of collaborators joined the project to continue development. pyRevit does 3 things:
1- Awesome tools: Provide a collection of insanely useful tools such as the Pattern Maker, Colored tabs, and many more.
2- Extensions: creators in the community provide extra collections of tools you can download for free.
3- Custom toolbars: In addition to the default tools, you can use pyRevit to create your own tools using the Python language.
In this post, we focus on the first point: exploring the default tools included in the out-of-the-box pyRevit.
Watch the video:
After you finish installing pyRevit, you will see all the tools. Quite a lot of them! This tool covers some of the most interesting ones, but feel free to explore and discover by yourself.

If you see a tool with a bullet • next to it, it means you can do a shift-click on the tool to access the options.

pyRevit is available in English by default, but you can also use it in French and Russian. Other languages are listed, but the translation isn't complete. To change the language, go to the settings.

Then, go to the UI/UX submenu and select another language in the dropdown menu.
 Here is pyRevit in French! 🥖🍷

Alright, let's get started with the 20 amazing tools!
What it does: create a pattern based on detail lines.
If you aren't using this one yet, your mind will be blown. Create a drafting view and raw the pattern you want with detail lines.
This wood pattern is drawn with detail lines: Select all the lines and select the pattern maker.
 You will see this menu. You can decide on multiple options for the pattern. Pick whether you want Detail or Model. I recommend creating a Filled Region type so you can test the pattern to ensure it works.

Then, follow the instructions on the screen. Click on the pattern at the bottom left, then click on the top right.

 The pattern should be created. You'll see a dialog box that confirms it.

Create a new filled region to confirm that the new pattern works according to your expectations. How cool is that?
What it does: assign colors to the view tabs based on the project or family.
This tool is so brilliant that I refuse to use Revit when it's not active.
The different view tabs in Revit will be colored based on all the opened projects or families. In the example below, there are two Revit projects opened (solid fill), and one family opened (line).

What I love about the colored tab is that you can customize all the colors. Go to the pyRevit settings.

Go to the UI / UX settings. Here, you can set the colors you want. For example, you could use the brand colors from your organization. You can also decide what kind of fill or lines you want for the projects and the families. I like using background fill for projects and Top Bar - Medium for families.

Finally, it's important to give a shoutout to the Parallax Team for their great Neat UI plugin, which inspired the pyRevit colored tabs. The Parallax version has more features and customization options and is available for the new Revit releases more quickly.
What it does: generates a model health dashboard.
This is a tool to verify model health. It has multiple "checks" you can use, the best one to get started is "Model Checker".
 It will run an analysis of your Revit model, raising flags for things that are considered bad practices. For example, it spotted that there are 50 views not placed on sheets. This is great to have a quick glimpse of a Revit model health.

What it does: create a color scheme based on parameter values.
Colorsplasher was originally developed by BIM One but eventually discontinued. Jean-Marc from pyRevit rebuilt the tool, which is now even better.
This tool colors elements in a view based on specific parameters.
Select the tool, select a category, and then pick a parameter.

You will see all values along with colors. You can select a specific color for each value, or you can create a gradient.
 When you are happy, click on Apply Colors.
 You can see the result in the view.

Length might not be the best parameter to test this out, as almost all walls will have a different value. Let's try out Type Name instead.

Click on Create a Legend. A legend view with all colors used in that view is created.

Another awesome feature is Create View Filters. Creating filters manually in Revit is very boring. This tool automates the process:

Note: the Create View Filters was buggy in some of the test I ran.
What it does: create multiple sheets at once.
Creating multiple sheets in Revit has always been slow and boring. Some Dynamo scripts can help, but they can’t compete with the efficiency of the pyRevit Batch Sheet Maker tool.
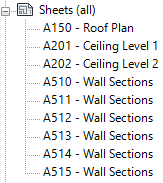
Click on the Sheets icon in the pyRevit tab, then select Batch Sheet Maker. You will get the following dialog box. Enter the sheet number, then press tab and enter the sheet name.
If multiple sheets have the same name, you can create a range of sheets by using the :: symbol as below for the wall sections (A510::A515).

You will then be asked to pick a Title Block. Pick one and click on OK.

Have a look at the sheets of the projects. They have all been created! Another boring task automated.
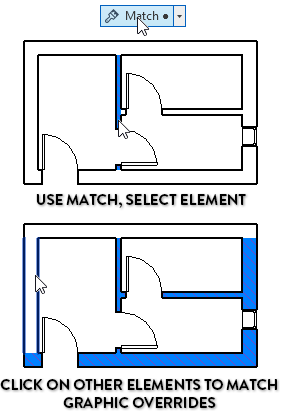
What it does: match the override graphics from one element to another.
You might be familiar with Revit Match Type Properties tool. It takes the type properties from an element are spread to another element. pyRevit has a seemingly similar tool called Match•.
However, instead of changing the type properties, it will share the override graphics from one element to another. In the example below, we use the Match tool to spread the graphic override of a wall to other walls in the view.
For some strange reason, you can’t copy a legend from one Revit project to another. You have to create a new legend and manually copy/paste the content inside the schedule.
pyRevit has a tool called Copy Legends To Other Documents. It can be found under the Legend menu. Select the project you want to copy the legends to, then select the legends you want to copy.

What it does: Match the zoom extent on different views.
This is the kind of tool you didn’t realize you needed so badly until you tried it. It keeps all views in the same zoomed area, so you can keep working on the same sector without having to zoom and pan.
For example, let’s say you have a big 5-story building and are working on the top left corner of it. When Sync Views is toggled, the same area will display on your screen when you switch to another level or to an RCP plan.

What it does: Know who created or last modified a specific element.
This is the sneakiest tool of the bunch. Did you ever work on a project with multiple users only to find an important architectural element floating in the middle of nowhere? And no one admits their mistake? The Who Did That?? tool allows you to see the last person who performed a specific task.
In the example below, we want to know who moved a floor. Select the floor and pick the Who did that?? tool on the Teams dropdown menu. A dialog box will display the Creator, Owner and Last Change By user names for the element. Then, you can have an intervention with Waldo.

What it does: purge elements that can't be purged with the default tool.
Revit has a tool called Purge Unused that can help you remove unused items in your models. However, this tool is often not enough if you want a deep clean. There are always a few remaining elements that can’t be removed.
pyRevit Wipe tool allows you to go much deeper. You can see all the categories you can clean in the image below. The “Wipe Model Components” allows you to mass delete elements like views, sheets, walls, etc. That might be useful for a cleanup before sending a Revit model externally.
Be careful: some of these wipe tools are quite hardcore and can damage the model.

What it does: pre-filter specific categories before selecting elements.
The most common way to select a category of elements is to use the default Filter tool. The problem is that it can be a little annoying to constantly check and uncheck categories.
pyRevit’s Pick tool allows you to pick a specific category before selecting.

By expanding the Pick dropdown menu, you will also find tools to either pick Detail elements or Model elements.
What it does: print based on a sheet list schedule.
Revit has a special schedule called Sheet List. It allows you to create a list of sheets, usually to be placed on the front page on a set of sheets. This list is usually filtered to only show sheets from a specific revision.
pyRevit has a tool called Print Ordered Sheet Index that allows you to print sheets from a specific sheet list. This is useful to make sure you are printing the correct sheets from a specific list or revision.

What it does: hide specific tabs in the ribbon.
Too many tabs in your Revit user interface? Too many plugins installed? The Minify UI can help with that.
First, shift-click on the tool to set the options. Then, pick the tabs that you want to hide. When you are ready, click on "Hide Selected Tabs in Minified Mode".
 Now, click on the Minify Revit UI button. The circle should become orange, and the selected tabs will be hidden.

What it does: reduce the time of a sync to central.
Did you know that syncing to the central will take longer if multiple views are opened, especially 3D ones? pyRevit has a custom sync to central that can close views and reopen them.
First, you have to set the options. Shift-click on the synchronize tool. Pick the option you want. A good one is the second, called Close them, but reopen them right after.

Then, do a regular click on the Synchronize tool. The views are closed but immediately reopened.
On the top right of your screen, you'll also see the synchronization time:

What it does: shows a visual representation of the view range in a 3D view.
Are you struggling to understand view range? This is for you. First, go to a 3D view. Click on the Show View Range tool.

Select a plan view or a RCP view on the project browser. The value will appear, and colored lines will show up in the 3D view to indicate the elevation of these planes.
 This can be helpful when explaining the view range to beginners.
Note: we've had issues using this tool in Revit 2024, or when the View Depth is set to "unlimited".
What it does: manage keynotes directly in Revit.
Keynotes are great, but they require you to manage a file outside of Revit. Editing the file can be a pain. With pyRevit Manage Keynotes tool, you can modify keynotes without opening an external file.
 Here is the menu:

Create a new category: In the example below, we use the pyRevit Keynote Manager to create a new subcategory of keynotes.

Create a new keynote: Now that we have a new category, let’s create a new note. Click on the icon and pick the category. Enter the unique key and the description. Click an Add Keynote. That’s it!

Create "child" keynote: To create subcategories, you have to create to create “notes as child”. Click on the icon like in the image below. Enter the key and description. That’s how you create subcategories.

What it does: Creates a list of all loadable families in a project, with the file size.
A project full of heavy families is a sign of bad management practices. In the Inspect dropdown menu, you'll find the List Family Size tool.

You have to be patient: this might take a few minutes. You will get a list with all families, their sizes, names, and the creator's name. This is the Revit default Snowdon towers project, so the creator is Paul Aubin.

Any families over 2MB would be a red flag. You can see they've done a decent job on this project to limit heavy families.
What it does: Shows how many 2D lines there are for each view in a project.
Too many 2D elements such as lines is a sign of BIM degeneracy. Instead of using actual modeled elements, users might decide to use lines to save time. This is bad for you, for your team, for your collaborators, and you will eventually lose way more time than you think you are saving.
In the same Inspect dropdown menu, pick the Lines per View Counter tool.
 It will generate a list of all views in a project and indicate the number of 2D lines for each. More lines in a view means more problems.

Again, the Snowdon project seems pretty good in this regard, as only Life Safety and roof plan layouts seem to have lots of 2D lines. Good job, Paul.
What it does: switch from a family type to another in the family editor.
Inside a family, switching from one type to another is a boring process. You must go to the family types menu, pick another type in the dropdown selector, and close the menu.
With Cycle Types, press one button to quickly switch from one type to another. This allows you to test the family faster with different types

What it does: create your own toolbar in a few clicks.
This is for more advanced creators who want to get started developing their own custom toolbar using pyRevit and Python. First, go to the Extensions menu.

The first extension on the list might be pyRevitBundlesCreatorExtension by Jean-Marc Couffin. Select it and click on Enable.

You will see a new tab called pyRevit Bundles Creator. Inside of it, you will see the Create Buttons tool.
 First, create a name for the panel.
 Then, you can select what kind of tool you want. It can be a Python script tool, a URL button, a C# DLL button, or even a button that links to a Dynamo script.
 Then, give a name to the tool itself:
 You'll see the new tool in the pyRevit Bundles Creator menu.

To be clear, this tool helps you quickly create the button, but you still need to actually add the code to the buttons.
If you've enjoyed this post, you will like this discussion I had with Jean-Marc Couffin, also known as the pyRevit uncle:

⏰ Last Chance: Spring Sale ends on April 23rd
🔥 Save big: Get 20% off on all BIM Pure courses & content.
🧠 Get Revit Mastery: Access our full catalog of courses, templates, families, and live events.
Enter your details below to get this free guide.