13 Beginner Mistakes to Avoid in Revit [2024 update]
Apr 23, 2024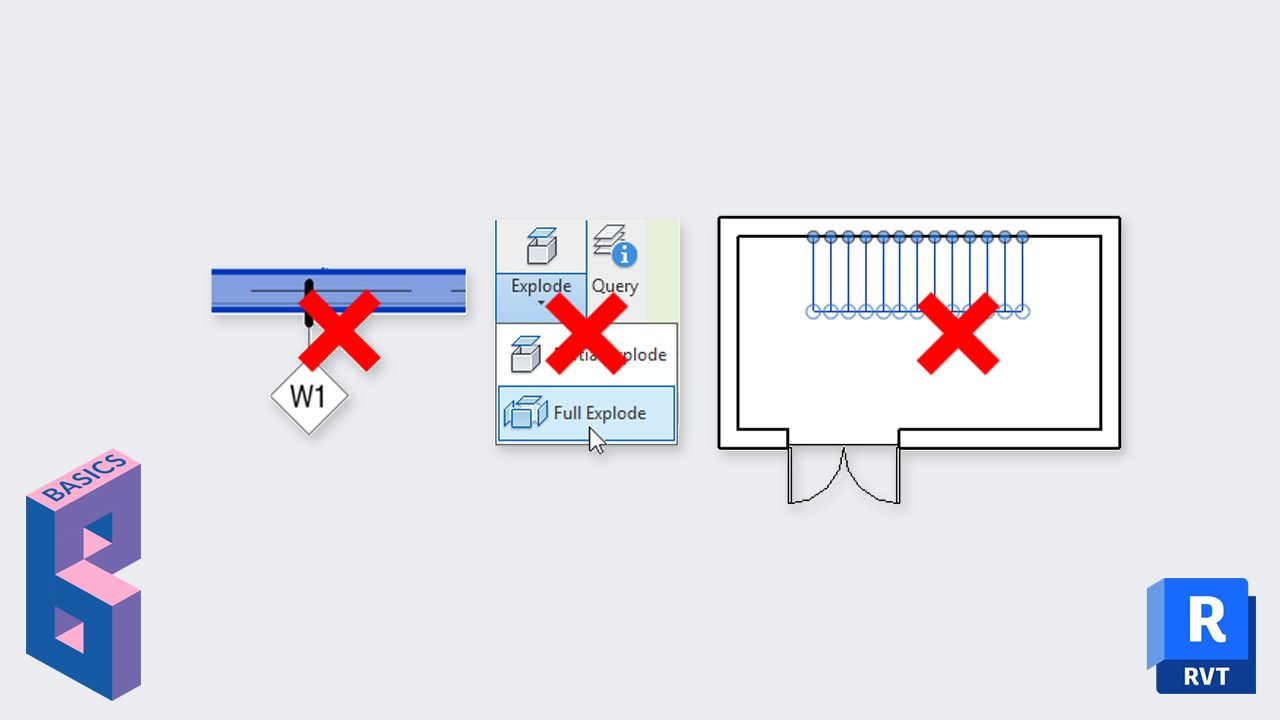
In the last 13 years, I’ve had the chance to coach hordes of beginners with Revit. I realized the same mistakes are repeated over and over again. They are often caused by users trying to use Revit as if it was AutoCAD. This post covers these frequent mistakes and provides solutions to avoid them.
This guide was initially published in 2019, but it was refreshed in April 2024.
This blog post has a full video tutorial you can watch here:
This is #1 for a good reason: exploding a CAD file inside Revit is one of the worst mistakes you will make in your life, ever.
The problem is that Revit will convert all layers into a Linestyle. That means if you have a big CAD file with a lot of layers, you will have dozens of dumb, useless linestyles. This is the nightmare of all BIM managers.

We wrote a guide about how to properly use CAD files inside Revit. Short story: purge all CAD files, use Link CAD instead of Import CAD. If you really have to explode a CAD file, do it inside a family or in a dummy project.
Most Revit families you will find online are terrible. A good Revit family should be lean, efficient and without too many parameters.
Remember that when something is free, it means you are the product. Manufacturers create Revit families as advertisements for their products. That means their incentive is not to create lean and efficient families. It’s to create families so you will end up buying their products.
For example, most families you will find on BIM Objects will have a bunch of parameters like phone number, URL and other useless junk that doesn’t provide any meaningful value to your project.
The other problem is that they are often built as “super-families”. That means they have 50 options that can be activated by checking parameters. The problem is that the family ends up being 3 MB, which is way too much for what you actually need. Too many heavy families in a project will cause performance issues.
In the image below, you can see a random window family found online. It is an absolute mess.

What is the alternative? If available, try to use the default Autodesk Revit families. They are usually very well constructed and efficient. Also, you should have your own team of people modeling the families you need.
In some cases, a free family found online might be a good match for your project. If that’s the case, make sure to clean and purge the family first.
The Worksets tool is misunderstood. Many users coming from the CAD world think worksets are the same things as layers. That’s just not the case.
Here is a terrible way to use worksets:

Worksets were intended to use to avoid performance issues. You can turn off certain parts of a building so your model will be a little faster.
These days, you should limit the number of worksets to the minimum. A workset for levels, grids and reference planes is a good idea. All other elements should be in a workset called “A-Architecture”. You can create other worksets with prefix Z for linked elements.

The legit way to control the visibility of elements is to use the Visibility/Graphics menu with the View Template feature.
Note: Worksets are only used when you are creating Central and Local files to collaborate on a model. Revit LT users don’t have access to this feature.
I can’t count the number of times I’ve heard: “Revit is great for modeling, but we go back to CAD for detailing”. Ugh..
The problem is that Revit detailing tools are often misunderstood. You have quite a lot of flexibility in how you organize detailing. The most common technique is to add detail components over 3D models. You also have the option to use Drafting Views, which are completely 2D views that are not linked to the model. This is a “2D Safe Space” where you can draft anything you want without being worried about hurting your Revit model.

When creating a section, callout or elevation, you can use the “Reference Other View” and select a Drafting View. This way, the view will be properly referenced when placed on a sheet while still being an entirely 2D view.

Another way to detail is to use real sections and callouts, but to shut down the model. The 3D elements will be invisible, but you will still see the levels and grids to use as reference. Tools such as “Spot Elevation” will also refer to the correct height.

In CAD, there is often a lot of “cheating” to quickly get the visual result you want. You can do the same thing in Revit, but it’s often a deal with the Devil. In the example below, a lazy user created a “Fake Tag” to annotate a wall. Instead of using a label in the tag, the user simply typed a text value. That means if the wall type is modified in the properties, that tag won’t be updated. Some beginners think they will save time using such techniques, but you will get in trouble eventually.

In the image below, we have a legit wall tag. When the wall is selected, the label inside the tag will become blue. That means modifying the value will affect the wall properties. This is the right way to do it.

Finding out how much to model and how much to annotate is a fine work of balance in Revit. In many cases, you must be careful not to overuse 2D elements. Revit allows you to use lines and masking regions, which are annotation elements that only appear in a view. While these tools might be useful in detailing views, some users overuse them in plan views to represent real geometry.
In the example below, a lazy user drafted stairs using detailing lines. The stairs aren't visible in a 3D view.

You might think this is a ridiculous example, but I see it quite often. People will justify by saying, "Oh, but we didn’t need to see the stairs in a 3D view anyway.” The laziness will almost certainly end up causing confusion at some point. You have to eliminate the 2D mindset and fully embrace the 3D world.
Another remnant of the CAD world is the dumb legend system. Many users create dumb text to annotate the plan views. “Dumb” means there is no link between the numbering of notes in the plan view and the description in the legend. That increases the risk of errors.
To be fair, Autodesk didn’t include a clear system of plan notes in the default templates. The keynote system can be complex for users getting started.
You might want to have a look at our automated Plan Note system. This system uses a schedule in the legend instead of text.

Some passionate users get excited and start over-modeling everything. A good rule of thumb is not to model elements smaller than 4’’ (100mm). That might vary for each project and LOD requirements, of course. In the image below, a user decided to model the fancy moldings at the bottom of the wall.

In some cases, it might be a good idea to model these elements, especially if you will use the model for renderings. If not, it’s probably a little too much. A simple drafting view with the profile of the molding should be enough.
Revit beginners often inadvertently delete essential elements like levels and grids. This is often a problem with former AutoCAD users, where deleting a line is not that big of a deal.
First, make sure to understand the “Hide In View” tool. This tool makes an element invisible in a view but preserves it in the model. In the example below, we select a wall and use the right-click menu. Select “Hide in View,” then “Elements.” The wall will be made invisible only in a specific view.
Use this tool sparingly, though. It is fine in a small project where you are working by yourself. In larger projects, BIM managers often ban "Hide in View" and instead rely on tools such as Filters and Visibility/Graphics.

Then, make sure to use the PIN tool. When elements are selected, this tool appears in the contextual tab. Elements will have to be unpinned before they can be moved or deleted. That should limit the path of destruction caused by beginners :)

Another frequent issue is moving elements by mistake. A major cause is a selection option called Drag Elements On Selection. This option is located at the bottom right of your screen. When activated, you can select and move elements in a single click. From my experience, this tool causes many problems and should be deactivated by default. Click on the small icon, and a small red X will appear. That means the option is now turned off.

Also, make sure to PIN all important elements. Pinned elements can’t be moved.
The coordinate system inside Revit is an absolute mess. We wrote a long post about it, and it is one of the most popular guides on this website.
The most important point is called the internal origin. It used to be invisible, but since the Revit 2020.2 update, it has a marker to indicate its position. It is different from the Survey Point and the Project Base Point. In the Visibility/Graphics menu, you can activate the visibility of this point.
Make sure to place your building close to the internal origin. It could be at the intersection of grids or foundation walls. When you link another file, this will be used as the 0,0,0 point. It will also be the default origin if you export to CAD.

It is becoming more and more common to render directly in Revit by using great plugins such as Enscape.
The downside is that people now place a bunch of objects in their Revit models that are only used for renderings. You obviously don’t want to print a set of CD documents only to find out there are a birds, cars, plants and wine glasses in your plans.
There are three ways to avoid issues with these RPC families. The first is to create a workset that is invisible by default. You can manually activate this workset visibility in the Visibility/Graphics menu inside of views used for renderings.

The other way is to create a linked “rendering” model that contains all families related to renderings.
The final way, and perhaps the best, is to create a design option that includes all RPC families. Make that option invisible by default.
Keep your project browser organized, or you will be the Revit Pain Pit.
In your BIM standards, have a clear naming structure for your views. A good tip is to add a number prefix at the beginning of all view names. Here is an example for beginners (from our BASICS course). Isn't that clear and pleasant?

Also, make sure to give proper names to all your families. You should add a custom prefix with the name of your business and another one to represent the family type.

Enter your details below to get this free guide.